Remote Desktop lets you control another computer, but getting files back to your local machine trips up most people. You can see the file on the remote desktop, you can open it, but copying it to your laptop requires specific settings enabled before you connect.
File transfer from remote desktop to local works through clipboard redirection, drive mapping, or direct UNC paths when RDP settings allow it. When Group Policy blocks those methods or the remote computer runs Windows Home, you need SFTP or third-party remote access software, like HelpWire instead. The catch is that clipboard and drive access must be configured in Local Resources before you click Connect, not after.
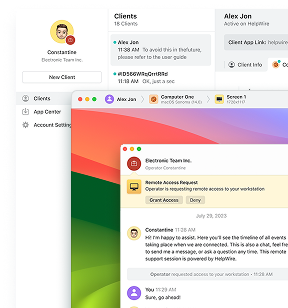
If you’d rather not configure Local Resources at all, HelpWire supports drag-and-drop and clipboard file transfer without any pre-connection setup, covered in Method 5.

How does file transfer work in Remote Desktop
Remote Desktop uses the rdpclip.exe process to sync your local clipboard with the remote session. For drive access, RDP exposes your local drives inside the remote session as redirected drives. You can usually access them through File Explorer or directly with paths such as \\tsclient\c. The Remote Desktop Connection client handles this redirection when you enable local resources before connecting.
Both clipboard and drive redirection require configuration on the client side before you establish the connection. Windows creates these mappings during the connection handshake. After you connect, changing the settings does nothing until you disconnect and reconnect with the new configuration.
The rdpclip.exe service runs on the remote machine and maintains the clipboard sync. Your local drives appear as redirected volumes in the remote session’s File Explorer under “This PC” when drive redirection is enabled. Redirected drives may appear as UNC-style paths such as \\tsclient\c, but access is provided through RDP drive redirection rather than a normal network share.
How to copy files from remote desktop to local machine
Method 1: Copy-paste via clipboard redirection
This method is best for smaller files and may fail with files around 2GB or larger. Clipboard redirection lets you copy files on the remote desktop and paste them on your local machine using Ctrl+C and Ctrl+V.
-
Open Remote Desktop Connection (Win+R, type mstsc.exe) and click Show Options.
-
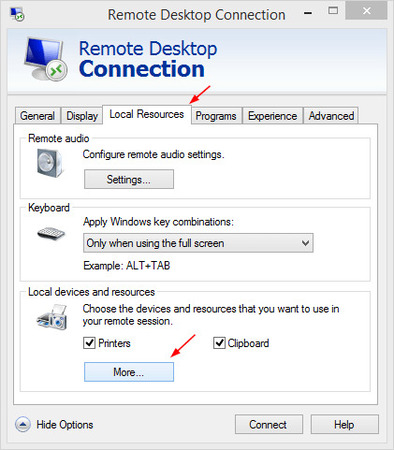
Go to Local Resources tab and check the Clipboard box under Local devices and resources.
-
Click Connect and log in to the remote machine.
-
On the remote desktop, navigate to the file and copy it (right-click → Copy, or Ctrl+C).
-
Switch to your local machine (minimize RDP window or Alt+Tab) and paste the file where you want it (right-click → Paste, or Ctrl+V).
The file transfers through the clipboard buffer. Windows copies the file data through the RDP connection and writes it to your local disk. For multiple files, select them all before copying. The process works the same for folders.
Limitations: Copy-paste may fail with files around 2GB or larger. Transfers above 100MB slow down noticeably because RDP keeps both clipboard buffers synchronized during the transfer. The rdpclip.exe process on the remote machine handles this sync, and it processes files sequentially.
Method 2: Drive redirection (recommended for large files)
Drive redirection maps your local drives to the remote desktop session. The remote session shows your local drive as a redirected drive. You copy files using normal File Explorer operations.
-
Open Remote Desktop Connection (mstsc.exe) and click Show Options.
-
Go to Local Resources → More → expand Drives and check the boxes for drives you want to access (typically Local Disk C:), then click OK.
-
Return to the General tab, connect to the remote machine, and open File Explorer on the remote desktop.
-
Look under “This PC” for your redirected drives (they appear as “C on COMPUTERNAME”).
-
Copy files between the remote desktop and your redirected local drive using standard File Explorer copy-paste.
Your local drives remain accessible throughout the entire RDP session. The remote session exposes them like redirected drives, so you can browse and copy files through File Explorer.
When to use this: Large files (over 100MB), multiple file transfers in one session, or when you need bidirectional access throughout your remote session. Drive redirection works better than clipboard for batch operations.
Method 3: Direct tsclient path access
The tsclient path provides UNC access to your local drives even when drive redirection appears not to work. This path accesses the same redirected drive directly by path, even if it does not appear clearly under “This PC.”
-
Ensure drive redirection is enabled (follow Method 2, steps 1-7).
-
Connect to the remote desktop.
-
On the remote machine, press Win+R to open Run.
-
Type \\tsclient\c and press Enter (replace c with your drive letter).
-
File Explorer opens showing your local C: drive contents.
-
Copy files between this window and the remote desktop as needed.
The tsclient path works as a standard UNC network path. You can map it as a network drive for persistent access during the session. Open Command Prompt on the remote machine and run: net use Z: \\tsclient\c. This creates a Z: drive mapping to your local C: drive for the duration of the session.
When to use this: Drive redirection is enabled but your local drives do not appear under “This PC” on the remote desktop. The tsclient path accesses the same redirection mechanism through a direct UNC path instead of the File Explorer interface.
Method 4: Use SFTP when RDP file transfer is blocked
Some corporate networks disable file transfer through separate RDP policies. “Do not allow drive redirection” blocks redirected local drives and \\tsclient paths. “Do not allow Clipboard redirection” blocks clipboard copy-paste. If your organization disables both, use SFTP or another approved secure file-transfer method.
-
Install an SFTP server on the remote machine. OpenSSH Server is available as an optional Windows feature on supported Windows client and server editions.
-
On the remote machine, open Settings → Apps → Optional Features → Add a feature.
-
Search for OpenSSH Server and install it.
-
Open Services (services.msc) and start the OpenSSH SSH Server service.
-
Set the service to start automatically.
-
On your local machine, install an SFTP client like FileZilla or WinSCP.
-
Connect to the remote machine using its IP address, port 22, and your Windows credentials.
-
Transfer files through the SFTP client interface.
In managed corporate environments, check with your IT team before enabling OpenSSH Server or opening port 22. SFTP bypasses RDP redirection restrictions, but it still needs to comply with your organization’s security policy.
Method 5: Use HelpWire when RDP is unavailable or blocked
HelpWire provides remote access and file transfer without requiring Remote Desktop Protocol. This works when the remote computer runs Windows Home, when RDP is completely blocked by policy, or when you need simpler setup without RDP configuration.
-
Download and install HelpWire on your local computer (the operator computer).
-
Set up a remote support session with the client computer through HelpWire’s connection process.
-
Once the remote session is active, transfer files using copy-paste through the clipboard.
-
On your local computer, right-click the file and select Copy, or press Ctrl+C (Windows) or Cmd+C (macOS).
-
Right-click at the desired location on the client’s computer and select Paste, or press Ctrl+V (Windows) or Cmd+V (macOS).
HelpWire also supports drag-and-drop from your computer to the client’s computer. Drag files onto the HelpWire Operator app window, then paste them at the desired location on the client’s computer.
Linux note: When connecting from Linux using Wayland, you need to grant clipboard access permissions when prompted at the start of the remote session.
HelpWire runs on Windows, macOS, and Linux. The file transfer operates through clipboard redirection during an active remote session, so it works independently of RDP restrictions. Group Policy settings that block RDP drive redirection and RDP clipboard do not affect HelpWire’s clipboard because it uses its own remote access protocol.
When to use this: The remote computer runs Windows Home edition, your organization blocks all RDP file transfer methods, you need to transfer files between different operating systems, or you want a simpler setup without configuring RDP Local Resources settings. HelpWire also works as a temporary solution while troubleshooting RDP configuration issues.
Comparison: Which transfer method to use
| Method | Setup Time | File Size Limit | Best For | Works When Group Policy Blocks RDP | Windows Home Support |
| Copy-paste | 30 seconds | 2GB clipboard limit | Single small files | No | Client only |
| Drive redirection | 1 minute | No 2GB clipboard limit | Multiple files, large files | No | Client only |
| tsclient UNC | 1 minute | No 2GB clipboard limit | When drives not visible | No | Client only |
| SFTP | 5-10 minutes | Depends on server, client, filesystem | Corporate restrictions | Yes | Client only |
| HelpWire | 2 minutes | Depends on plan and network | Windows Home, RDP blocked, cross-platform | Yes | Both client and host |
Copy-paste slows noticeably above 50MB because rdpclip.exe synchronizes clipboard buffers incrementally. Drive redirection and tsclient transfer files more efficiently. SFTP and HelpWire run outside the RDP protocol entirely, making them options when Group Policy blocks RDP file transfer.
Frequently Asked Questions
No. Native Windows Remote Desktop does not support dragging files between the RDP window and your local desktop. Use copy-paste with clipboard redirection enabled, drive redirection, or the \\tsclient path instead.
Text copy-paste and file transfer can be affected differently by client settings and policy. First, make sure Clipboard is enabled under Local Resources. If file copy-paste still fails, enable drive redirection and transfer the file through This PC or \\tsclient\c.
Open Remote Desktop Connection, click Show Options, go to Local Resources, click More, expand Drives, and select the local drives you want to access. You must configure this before connecting. After reconnecting, the drives should appear under This PC in the remote session.
Clipboard copy-paste in Remote Desktop may fail with files around 2GB or larger. For large files, use drive redirection or the \\tsclient path instead. These methods are not subject to the same clipboard limit, though transfer success still depends on storage space, permissions, session stability, and network quality.